Skip to Content

Sensory Travel Blog Posts

Apps for Users Who Are Blind and Visually Impaired

August 20, 2016 • sensorytravel

(UPDATED: 2023-04-12)

This page is a reference page of apps that can be used for independence in the community, for Orientation and Mobility, etc. Things are continuing to evolve and change at an ever increasing rate and updates to the original list are regularly necessary. At times an app will be updated by the developer and it may not have the same level of accessibility, at other times apps completely disappear from the various app stores when the developer is no longer supporting the app or the company is perhaps gobbled up by a larger company. In any event, I will update this post from time to time, which may include significant changes as the app world evolves. These apps are either specifically designed for blind or visually impaired users or are apps that work well with VoiceOver on iOS or TalkBack on Android devices; many are multi-platform and available on iOS via the Apple Store and Android via Google Play. The list is divided into several categories; there are quick links immediately following this paragraph to make it easier to jump to the category you are interested in. So, without further ado, here are the quick links and the list…

Accessibility Navigation and GPS Apps Transportation and Route Planning


Accessibility:

OKO (free)

An artificial intelligence (AI) app that helps pedestrians access information on the pedestrian signal. “Simply point the back camera of the phone towards the intersection that you want to cross and the OKO application will instantly detect the pedestrian traffic light and inform the user through audio and haptic feedback.” iTunes Store: https://apps.apple.com/app/apple-store/id1583614988

Seeing AI (free)

An app that uses artificial intelligence (AI) to provide information about what the camera sees. Can read text, handwriting, describe scenes, identify items from their barcode, identify currency, and more. iTunes Store: https://itunes.apple.com/us/app/seeing-ai-talking-camera-for-the-blind/id999062298 Google Play Store: https://play.google.com/store/apps/details?id=com.microsoft.seeingai&hl=en_US&pli=1

Be My Eyes (free)

To quote their website, “Be My Eyes is a free app that connects blind and low vision people with sighted volunteers and company representatives for visual assistance through a live video call.” Be My Eyes now also includes an AI (artificial intelligenc) feature called Be My AI if you prefer not to talk with a human. iTunes Store: https://itunes.apple.com/us/app/be-my-eyes-helping-blind-see/id905177575 Google Play Store: https://play.google.com/store/apps/details?id=com.bemyeyes.bemyeyes

Aira (free in some places, where Access Partners provide the service)

Remote assistance from trained representatives. Something similar to a Mission Impossible movie where the hero or heroine is able to be helped by someone in the background with computer information and a live video feed. iTunes Store: https://apps.apple.com/us/app/aira/id1071584352 Google Play Store: https://play.google.com/store/apps/details?id=io.aira.smart&hl=en_US

Lookout by Google (free)

An app that uses artificial intelligence (AI) to provide information about what the camera sees. Can read text, scan barcodes, describe photos, scan documents, identify currency, and more. Google Play Store: https://play.google.com/store/apps/details?id=com.google.android.apps.accessibility.reveal&hl=en_US&gl=US

Envision (free with in app purchases)

This is another AI app that offers lots of options for obtaining information, even learning peoples faces. iTunes Store: https://itunes.apple.com/us/app/envision-ai/id1268632314 Google Play Store: https://play.google.com/store/apps/details?id=com.letsenvision.envisionai&hl=en

Door Detection, People Detection, and Image Descriptions

Not an app exactly, more like features of an app. Apple’s newer iPhones allow the option of detectors in the built in Magnifier app (accessed through the settings within the app, last section in the settings area). As an example, here is some additional information on Door Detection, https://support.apple.com/guide/iphone/detect-doors-around-you-iph35c335575/ios And on People Detection: https://support.apple.com/guide/iphone/detect-people-around-you-iph19e03650c/ios

Voice Dream Scanner

Very affordable and powerful text to speech app from that is another addition to the Voice Dream suite of apps, all designed for blind and visually impaired users. iTunes Store: https://apps.apple.com/us/app/voice-dream-scanner/id1446737725

OneStep Reader

Text to speech by photographing print with automatic reading available and tactile guidance for aligning camera; expensive but very reliable and easy to use. iTunes Store: https://apps.apple.com/us/app/onestep-reader-multi/id1140835211 Google Play Store: https://play.google.com/store/apps/details?id=com.sensotec.knfbreader&hl=en_US&gl=US&pli=1

Visor Low Vision

Easy to use screen magnification with very simple controls; open the app an it is ready, touch on the screen to focus, etc. iTunes Store: https://itunes.apple.com/us/app/visor-magnifier/id944215829 Google Play Store: https://play.google.com/store/apps/details?id=de.visorapp.visor&hl=en

Vision Assist

This app is like having a CCTV in your pocket, complete with options for zoom, contrast, reverse polarity, freeze frame, etc. iTunes Store: https://itunes.apple.com/us/app/visionassist/id502356279?mt=8

VoiceDream Reader

Document reader that reads many formats of documents and has high quality voice with available options for fine tuning the playback of the text. There is also a lite version which is free. iTunes Store: https://itunes.apple.com/us/app/voice-dream-reader/id496177674

TextGrabber (free)

Text to speech using optical character recognition (OCR) by photographing text with the camera iTunes Store: https://itunes.apple.com/us/app/textgrabber-image-to-text/id438475005 Google Play Store: https://play.google.com/store/apps/details?id=com.abbyy.mobile.textgrabber.full&hl=en

Cash Reader (free with in app purchases)

Money identifier that works with currencies from around the world. iTunes Store: https://apps.apple.com/us/app/cash-reader-bill-identifier/id1344802905 Google Play Store: https://play.google.com/store/apps/details?id=com.martindoudera.cashreader&hl=en_US

EyeNote (free)

Money identifier from the United States Mint. iTunes Store: https://itunes.apple.com/us/app/eyenote/id405336354

Examine Clothes Color (free)

Color identifier that works quite well in describing even complex patterns. iTunes Store: https://itunes.apple.com/us/app/examine-clothes-color/id1074506449

TapTapSee (free)

Can take photographs and describe what is in the photograph or describe what a photograph is if it is already in your camera roll iTunes Store: https://apps.apple.com/us/app/taptapsee/id567635020 Google Play Store: https://play.google.com/store/apps/details?id=com.msearcher.taptapsee.android&hl=en

Drafts

Basic note taker that will automatically save any note you write and will also integrate with the Reminders app on iOS devices iTunes Store: https://apps.apple.com/app/id1236254471


Navigation and GPS Apps:

Apple Maps and Siri (built in iOS app, free)

Apple Maps is built into iOS devices and can provide spoken location information and pedestrian directions as well as use VoiceOver and Siri for accessibility. There are a number of cities that Apple Maps provides public transportation information for, but to date it only covers a portion of cities around the world; you can find the list of supported cities at the following link for information on Apple Maps: https://www.apple.com/ios/feature-availability/#maps-transit

Google Maps with Google Now and TalkBack (free)

Along with knowing the current location, can also provide location and directions with voice input and provide spoken details iTunes Store: https://itunes.apple.com/us/app/google-maps/id585027354 Google Play Store: https://play.google.com/store/apps/details?id=com.google.android.apps.maps&hl=en

GoodMaps Outdoors (free)

Full featured GPS app that has been developed specifically for blind and low vision travelers. This app was originally Seeing Eye GPS XT, but the app has now been acquired by GoodMaps and is now free! iTunes Store for subscription version: https://apps.apple.com/us/app/goodmaps-outdoors/id945756779 Android Version is coming soon.

BlindSquare

Terrific GPS app that is tailored to travelers who are blind and visually impaired. It integrates with other apps, such as Google Maps and Transit to provide route details with public transportation. Best value for price and features in this category. iTunes Store: https://itunes.apple.com/us/app/blindsquare/id500557255

Lazarillo GPS for Blind (free)

A relatively new addition to the field of accessible GPS apps; this one is available on both iTunes and Google Play and its price is a perfect match for trying it out. iTunes Store: https://itunes.apple.com/us/app/lazarillo-accesible-gps/id1139331874 Google Play Store: https://play.google.com/store/apps/details?id=com.lazarillo

Compass (built in iOS app, free)

This app is built into every iPhone and can be used with Zoom or VoiceOver to make the information accessible

Talking Compass (free)

Speaks the direction. Google Play Store: https://play.google.com/store/apps/details?id=com.tippu.talkingcompass&hl=en_US&gl=US

Ariadne

Very handy and accurate app for providing information about travel environment, such as direction of travel, landmarks, addresses, and street names, but does not generate point to point route directions. iTunes Store: https://itunes.apple.com/us/app/ariadne-gps/id441063072


Transportation and Route Planning:

Google Maps (free)

Great way to have a national, in fact an international connection to travel planning. Allows user to select directions based on travel modes of vehicle, bicycle, pedestrian, or transit iTunes Store: https://itunes.apple.com/us/app/google-maps/id585027354 Google Play Store: https://play.google.com/store/apps/details?id=com.google.android.apps.maps&hl=en

Apple Maps and Siri (built in iOS app, free)

There are a number of cities that Apple Maps supports public transportation information as well, but to date it only covers a portion of cities around the world, you can find the list of supported cities at the following link for information on Apple Maps: https://www.apple.com/ios/feature-availability/#maps-transit

Transit (free)

Transportation planning app with large bold numbers for bus routes; this app immediately shows you which bus routes are nearest to you and in many areas provides real time arrival information. iTunes Store: https://itunes.apple.com/app/apple-store/id498151501 Google Play Store: https://play.google.com/store/apps/details?id=com.thetransitapp.droid&hl=en

Moovit (free)

Transportation information for most areas. iTunes Store: https://itunes.apple.com/us/app/moovit-your-local-transit/id498477945 Google Play Store: https://play.google.com/store/apps/details?id=com.tranzmate&c=Moovit_Website&pid=Moovit_Website

Where To?

To find what is nearby, such as restaurants, banks, etc.; paid version seems to work best with VoiceOver iTunes Store: https://itunes.apple.com/us/app/where-to-find-best-places/id903955898

Haptic Footwear for Enhancing Independent Travel from Lechal

March 19, 2016 • sensorytravel


Haptic Footwear for Enhancing Independent Travel from Lechal

2016-03-19

First, I should dispense with the disclaimer; I have no connection with Lechal other than being a total geek for all things related to independent travel, especially those things that apply to non-visual travel. Simply put, I paid for the product out of my own funds and this post is entirely my own unabashed and unfiltered opinion. I was fortunate to jump on the band wagon early in the process and was in the first shipment group of products sent to the United States and am therefore participating in the beta version of the app for iOS (it is available for Android on the Google Play store at https://play.google.com/store/apps/details?id=com.ducere.lechalapp, but you need to be connected via the Test Flight app to try the Lechal app on the iOS system, at least for the moment). 

The footwear can be ordered in two different forms. The least expensive option is to order the product as insoles (you will be providing your own shoes in this case); you receive a pair of insoles along with the vibro-tactile pods that clip into the bottom of the insoles. The other way Lechal can be order is in the form of shoes with a pod clip on the outside of the shoe, just at the ankle. The shoe option carries a bit higher price so I went with the insole option to start with. Both can be viewed via the Lechal Web site at, http://lechal.com

What Comes in the Box

IMG 9418

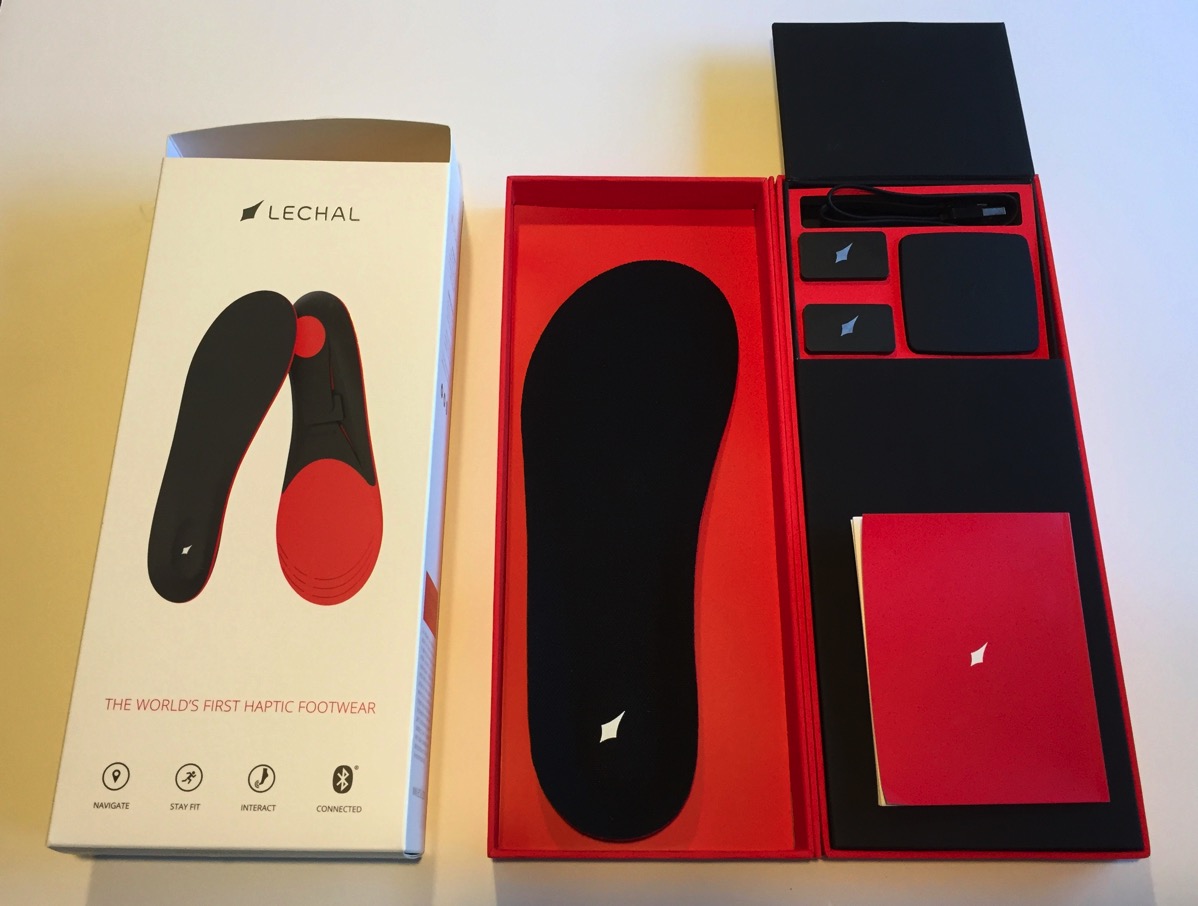
Figure 1, Packaging and enclosed product from Lechal Haptic Footwear, including insole, two pods, instruction pamphlet, USB cord, and pod charger


It seemed to be no easy task to ship the product; it begins its journey from Hyderabad, India. Mine had a multitude of holds and clearance hoops to jump through as it went across India, to Leipzig, Germany, and then through various cities in the United States. The delays likely included rules related to shipping lithium batteries at least that is my impression after receiving many pages of material safety data sheets in the shipping paperwork. When your package does finally arrive, you will find the following items included (if you order the insole option):

  • Two insoles, one is obvious as you open the box and the other is below the pod and charger packaging, on the right side of the box
  • Two small metal pods that contain the vibration mechanism and bluetooth
  • One charger for the pods
  • One USB cable to connect the pods to a wall charging adapter or other USB power source (note, it only includes the USB cable)
  • One instruction pamphlet (you can also preview the instructions at, http://lechal.com/guide.pdf


Connecting the Pods

IMG 9414

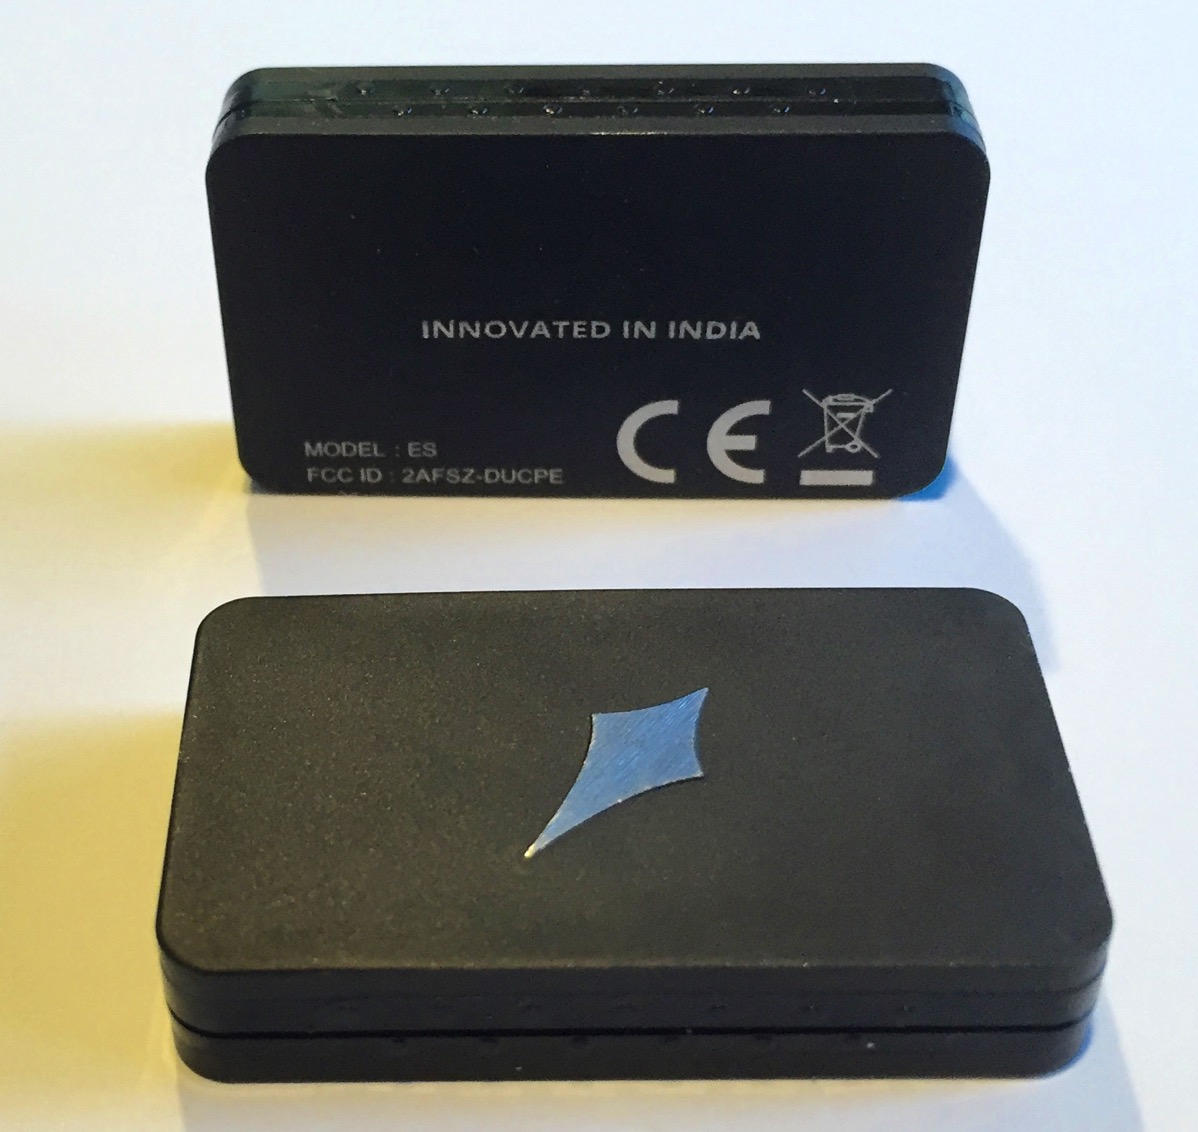
Figure 2, Two Lechal pods that are rectangular in shape and have one long edge with textured bumps for orientation to the device.


The pods themselves a small, rectangular boxes that are metal and surprisingly weighty considering their size. When I originally ordered from Lechal (July, 2015), there was the option of having “Essential Pods” or “Premium Pods”. I opted to purchase the premium version rather than putting the funds into the Lechal shoe option. I could not remember what the difference was between the Essential and Premium models so I returned to the Web site to investigate and am now only able to find the purchase option for the “Essential” model; I believe the components for the motion sensor were enhanced in the “Premium” version. On the surface they appear essentially the same, with the only obvious difference being that the Essential comes with brushed steel and the Premium a matte black finish; but now, back to the the pods themselves. 

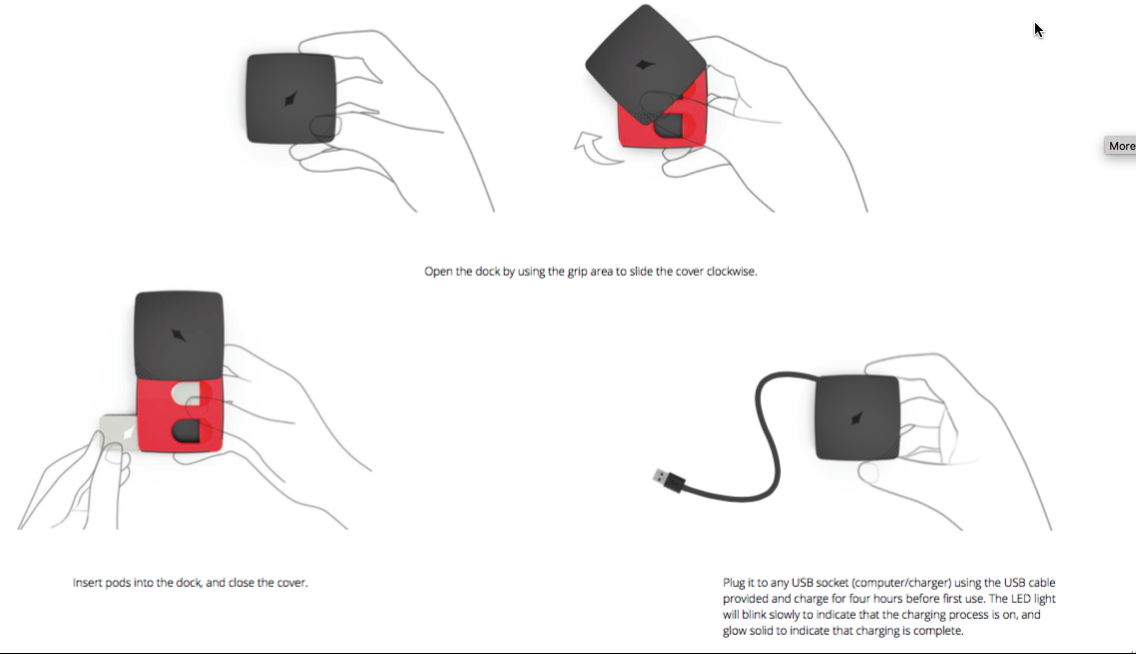
They have one edge that includes tactile markings in the form of bumps, to differentiate this edge from the other edges of the pod. The bumpy edge is where you would tap when you need to reset the pod, or wake it up so to speak when pairing initially with your smart phone. Before you begin pairing your pods you will want to have them fully charged by inserting them into the charger and plugging them into a USB power source. The full charge takes approximately two hours according to the documentation; there is an indicator light on the outside of the charger that will pulse while charging is occurring and will be continuously illuminated or steady when fully charged. I had bit of a struggle initially opening the charger but after several attempts, was able to open it by sliding on a bit of an angle from the textured area on one corner of the square charging dock (again, if all else fails, read the instructions…).

2016 03 19 12 40 43

Figure 3, Section from Lechal instructions showing how to open the charging dock and insert the pods


Once the pods are fully charged, you will want to bring them in very, very close proximity to your smart phone so that they can communicate and find one another with bluetooth. Hopefully as soon as you open the Lechal app, it will begin looking for the pods and find them immediately. If you are not so lucky, there is still hope. You will want to have your smartphone powered on and unlocked with the settings page opened to the bluetooth settings section. Take one of the pods and begin tapping continuously on the bumpy edge with your finger tip until it vibrates. At this point you will hopefully see the unit show up on your bluetooth device list that is displayed on your smart phone, it will likely say Lechal-MS; select it on your phone to connect. There should be no pin required for the two pods to connect to your smart phone via bluetooth. Once they are connected, you will see a Left and Right option on the Lechal app screen that is represented by an L and an R in the top right corner. This will let you tap on the left or right button to give a pulse to the corresponding pod so that you can place it into the correct insole. The insoles have lines around the toe area to trim them to the appropriate size for the shoe they will be inserted into.

IMG 9422

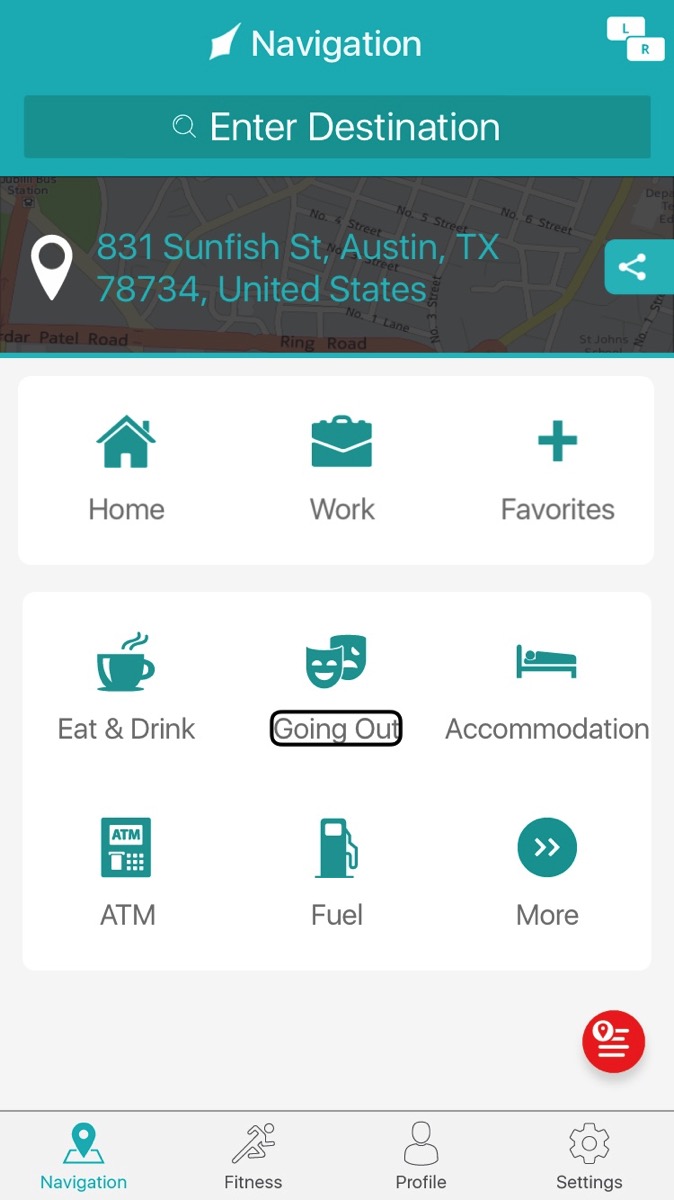
Figure 4, The Navigation home screen of the iOS app showing the “L” and “R” at the top right of the screen and options for Navigation, Fitness, Profile, and Settings pages at the bottom of the screen


IMG 9420

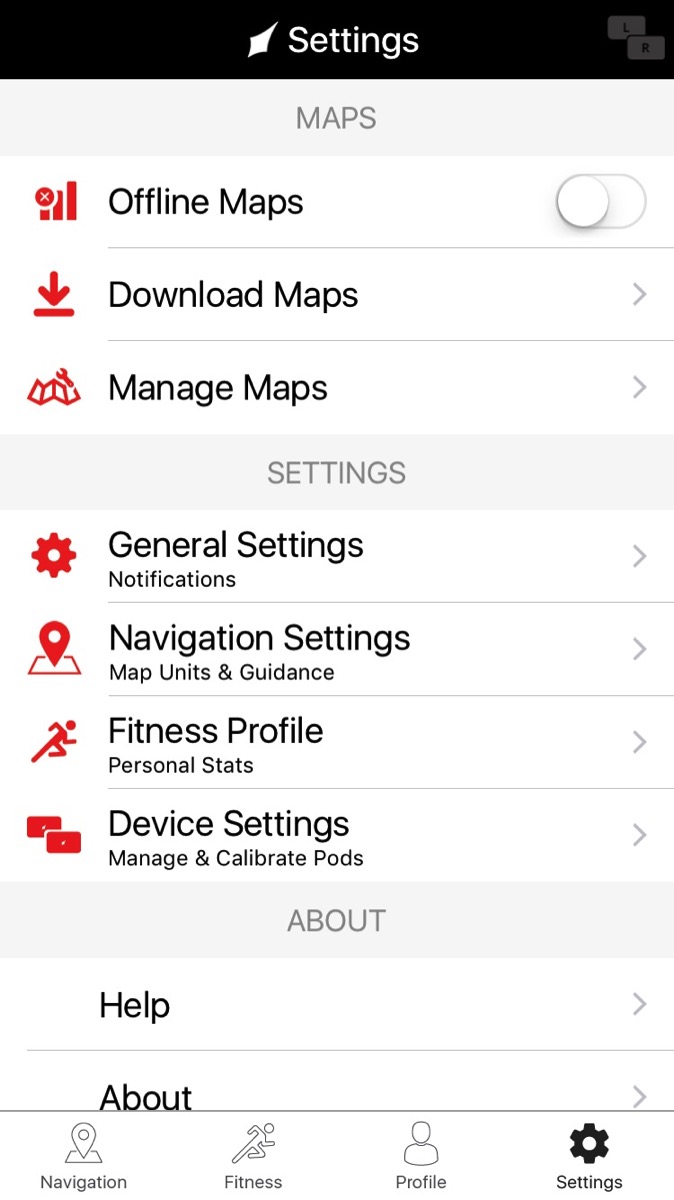
Figure 5, A screen shot of the Settings area of the app


IMG 9423

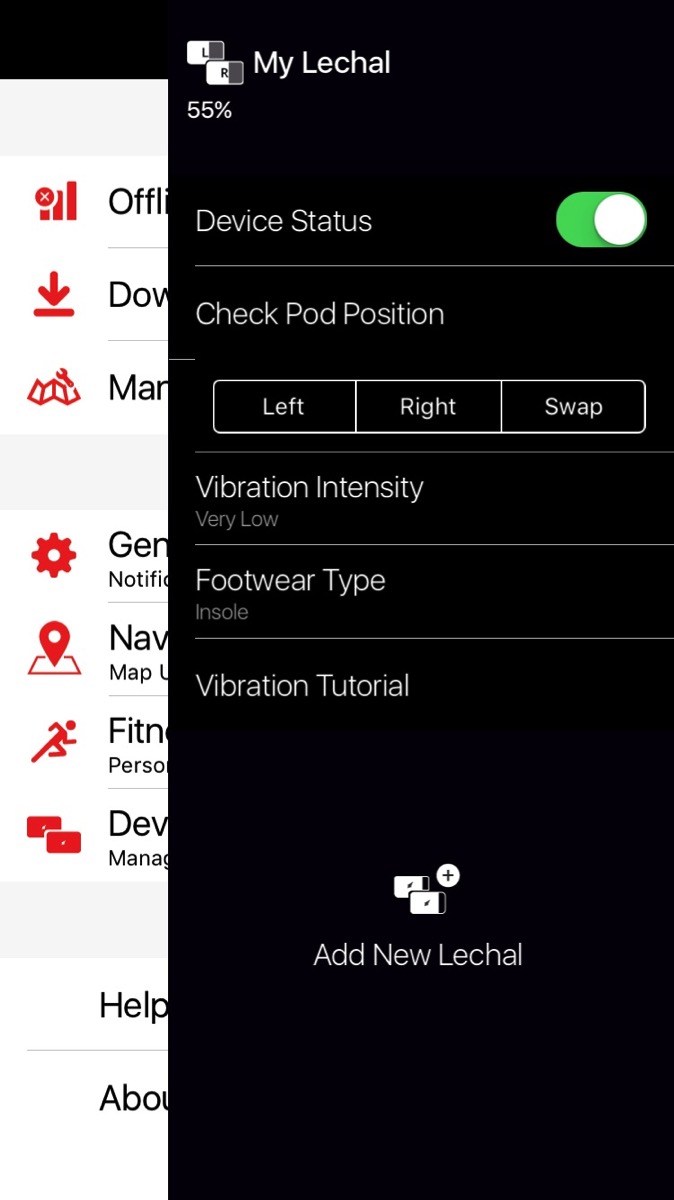
Figure 6, A screen shot of the Device Settings page with options to check the vibration of each pod and to launch a Vibration Tutorial


The Insole Option

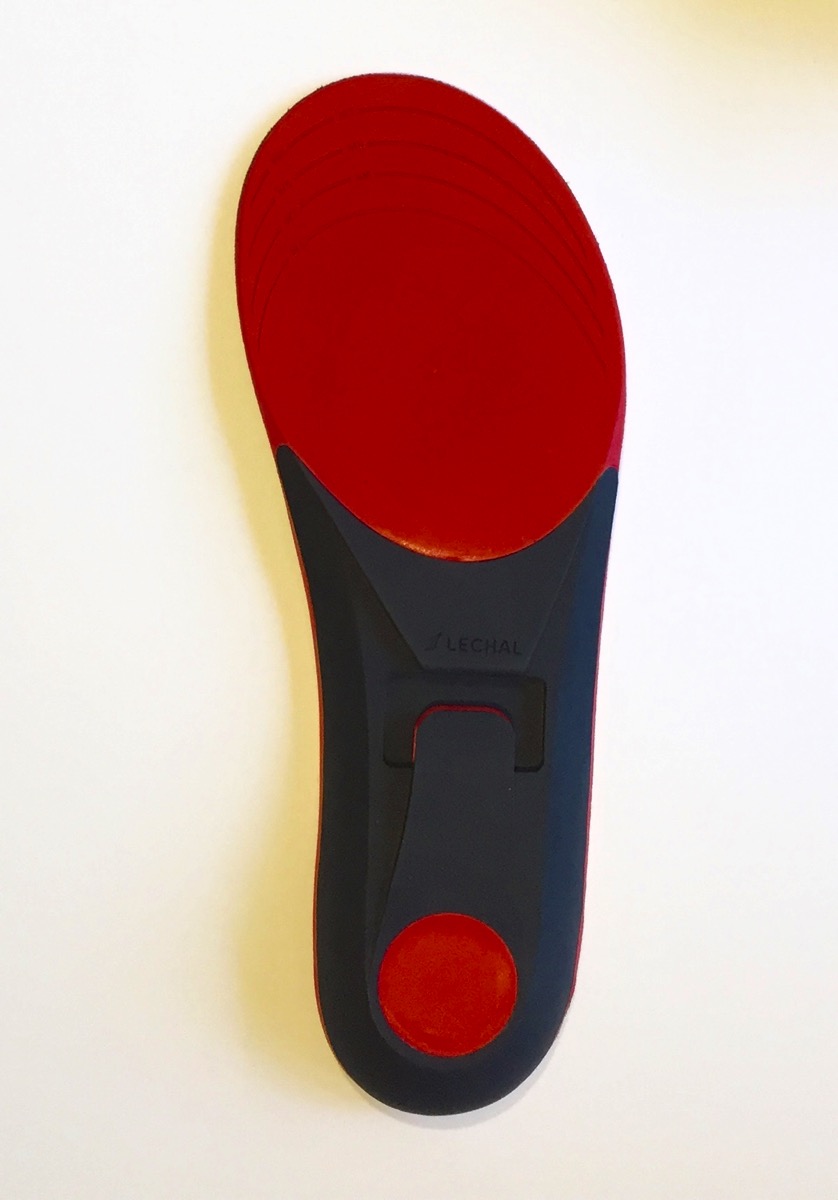
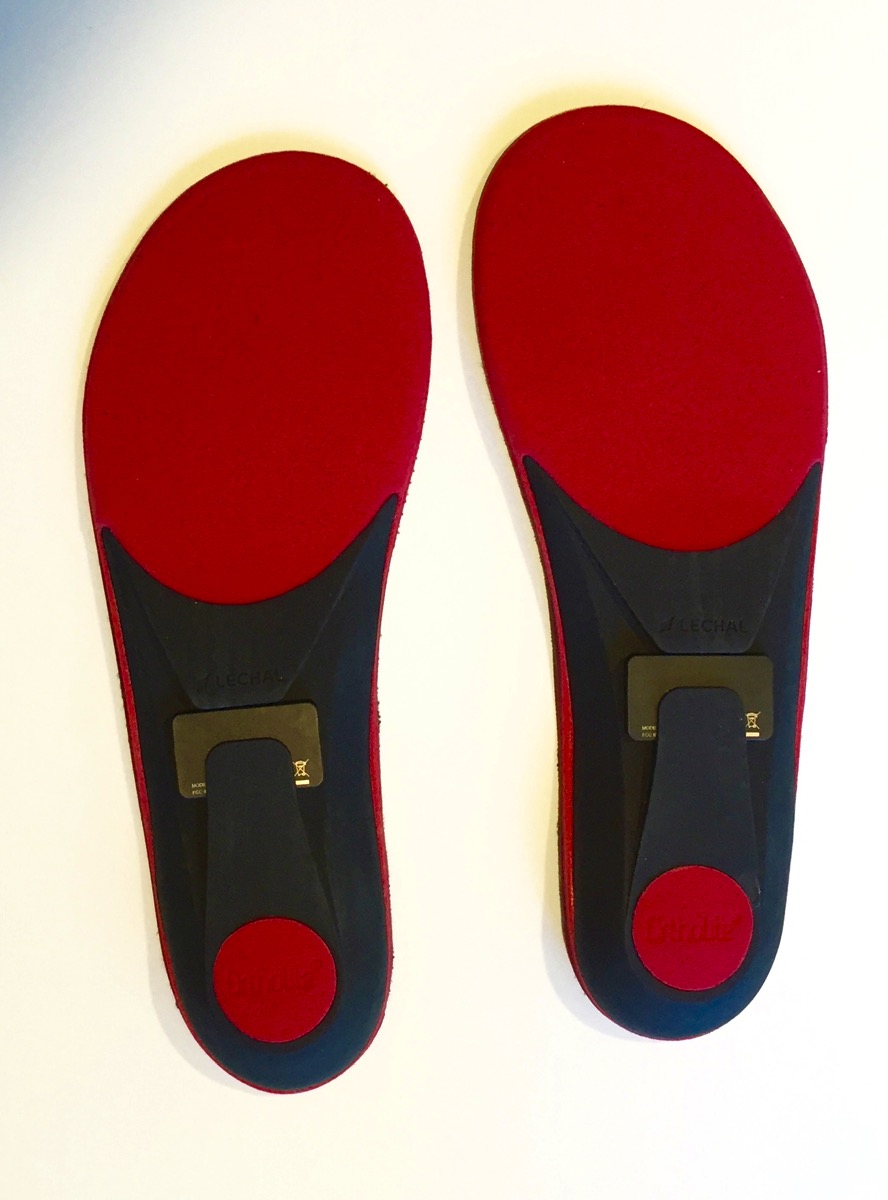
Once you have the pods paired with your device and you have determined which is for the left and which is for the right, you can install them into the Lechal insoles. There is a rectangular cutout on the underside of the insoles where the pod is to be placed. The “Innovated in India” marker should be facing out toward you with the Lechal logo of the pod facing the inside of the insole. You can then insert the insoles into your shoes and begin to explore.

IMG 9419

Figure 7, The underside of one insole with a rectangular cutout where the pod would be placed


IMG 9413

Figure 8, Insoles for the left and right shoe with the pods placed into the rectangular cutouts on the underside of the insole; a small flap keeps them in place where there are inserted into the cutout.


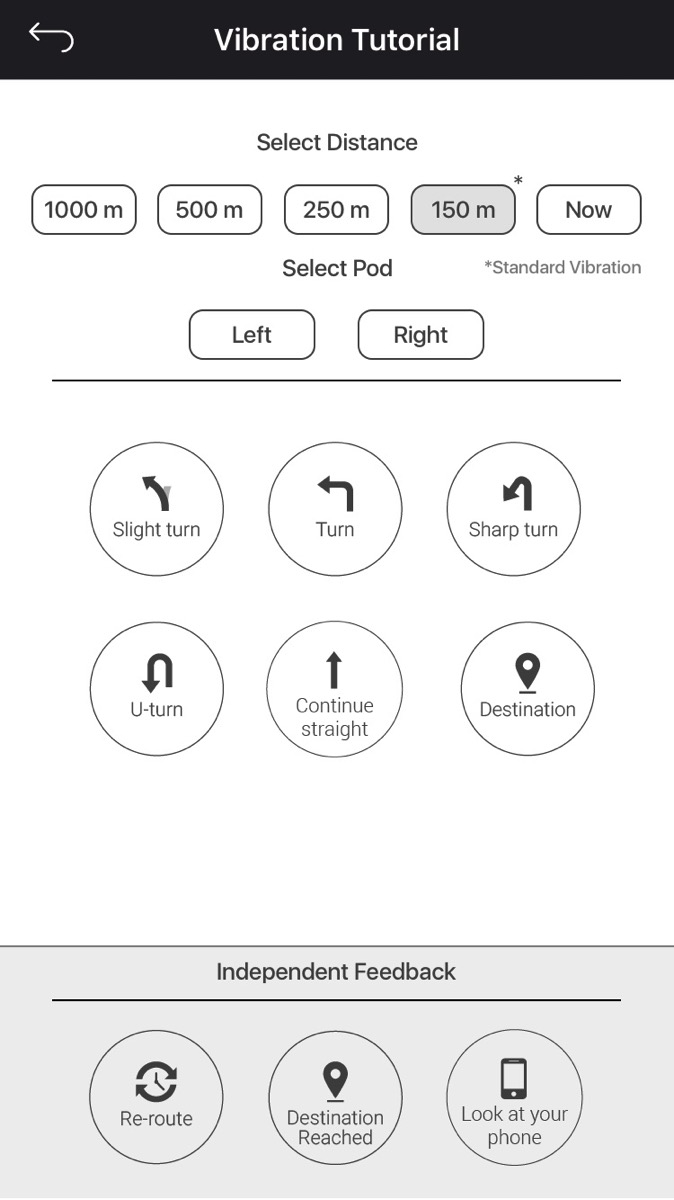
This is a good opportunity to launch the Vibration Tutorial from the Device Settings option of the main Settings page. Each type of turn has a different haptic signature that you will want to learn so that you can correctly interpret the instruction from the device without having to read the display visually or listen with VoiceOver.

IMG 9424 

Figure 9, Screen shot of the Vibration Tutorial screen with options for various turns, continuing straight, and destination


Working with the App

The app opens on the Navigation page that includes a search field at the top for entering an address or destination name, then shows your current location with a share icon to send your present location, and has a section for frequent travel options (i.e. Home, Work, and Favorites), and a section with categories that will show what is nearby within each category. The menu at the bottom of the screen provides links for the app’s four main areas or screens; Navigation, Fitness, Profile, and Settings. There are lots of different areas for customization, such as opting for Imperial Units of measurement or Metric, etc. 

IMG 9408

Figure 8, A screen shot of the Navigation page


IMG 9394

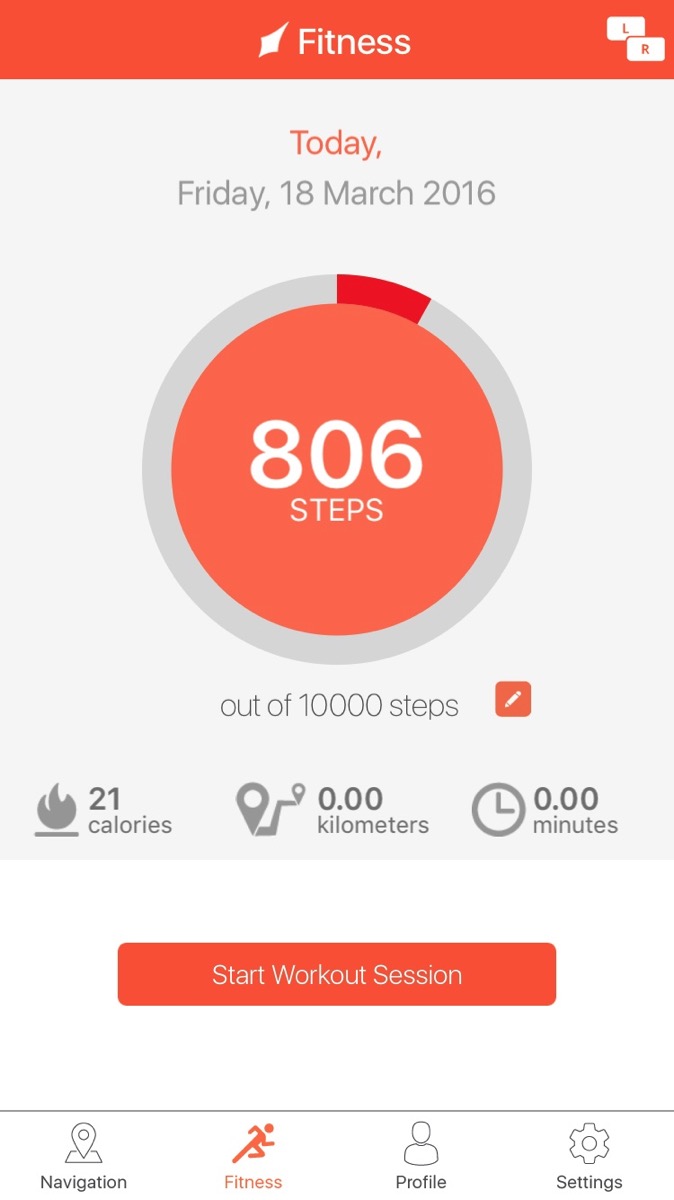
Figure 9, A screen shot of the Fitness page that includes number of steps taken, calories burned, as well as distance traveled and time in travel


IMG 9421

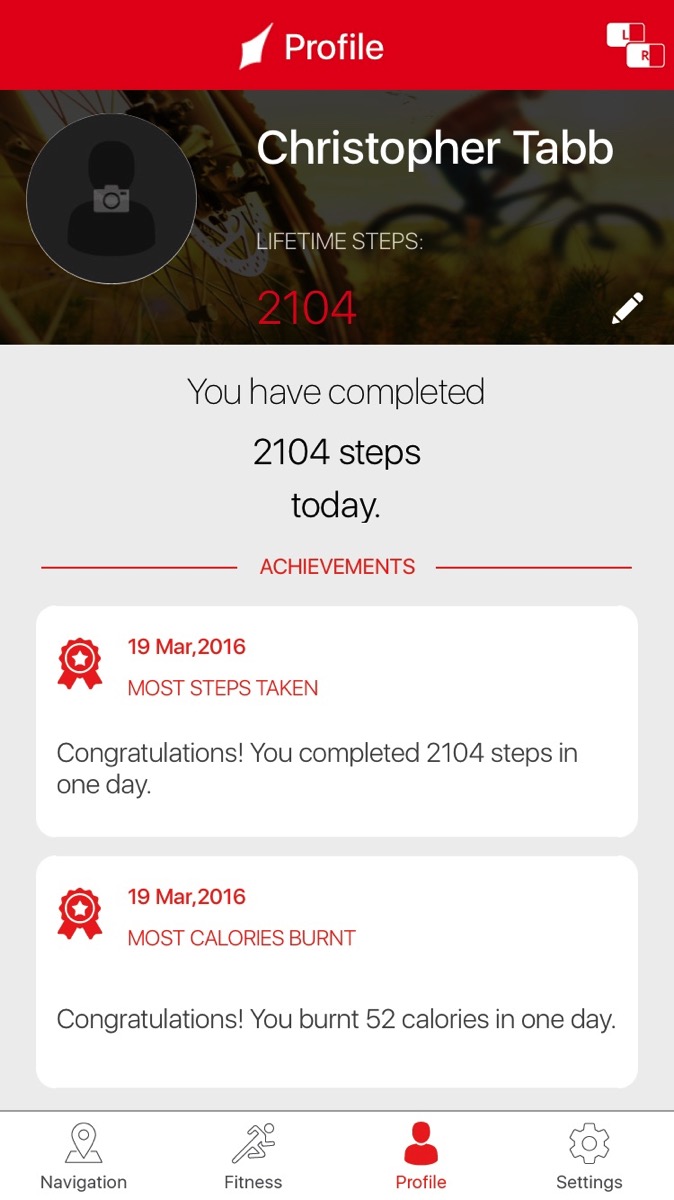
Figure 10, A screen shot of the Profile page showing the user’s name, their total steps for the day, and fitness achievements 


IMG 9420

Figure 11, A screen shot of the Settings page with options for managing and downloading maps, general settings, navigation settings, fitness profile, device settings, and an About/Help section


Navigating with App and Pods 

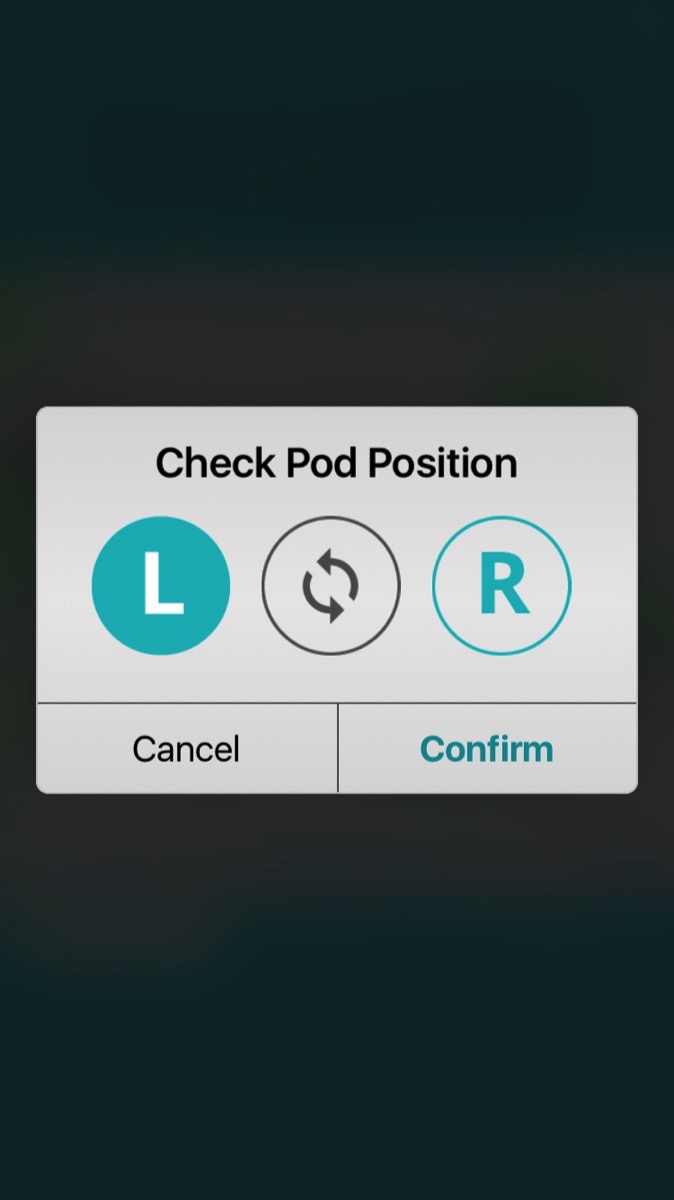
The app and haptic pods work together quite well while traveling a route. There seems to still be some areas to be developed in terms of VoiceOver, but the app is still in beta and there will likely be some updates along the way to bring the various aspects of the app further along in terms of refinement. You have the option of choosing from locations nearby or entering an address. Once you have chosen your destination, you will be given a screen to verify the pod positions to ensure that they are oriented correctly, and if they are not you have the ability to “swap” them in the app so that they will be receiving the correct message from your smart phone, to then relay the correct haptic message to you through your feet. Once your entered destination is found, you will be presented with an overview route screen and options for pedestrian mode, vehicle mode, or bicycle mode.


IMG 9397

Figure 12, Check Pod Position screen with buttons for testing “L” and “R” with a swap button between them.


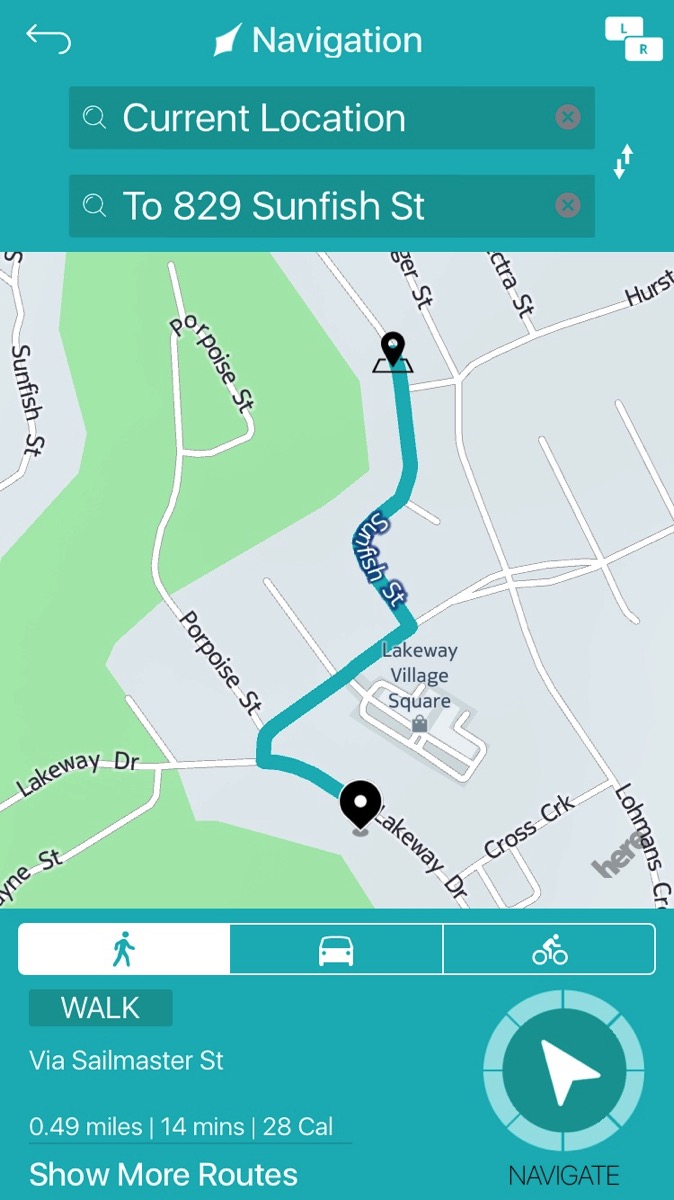
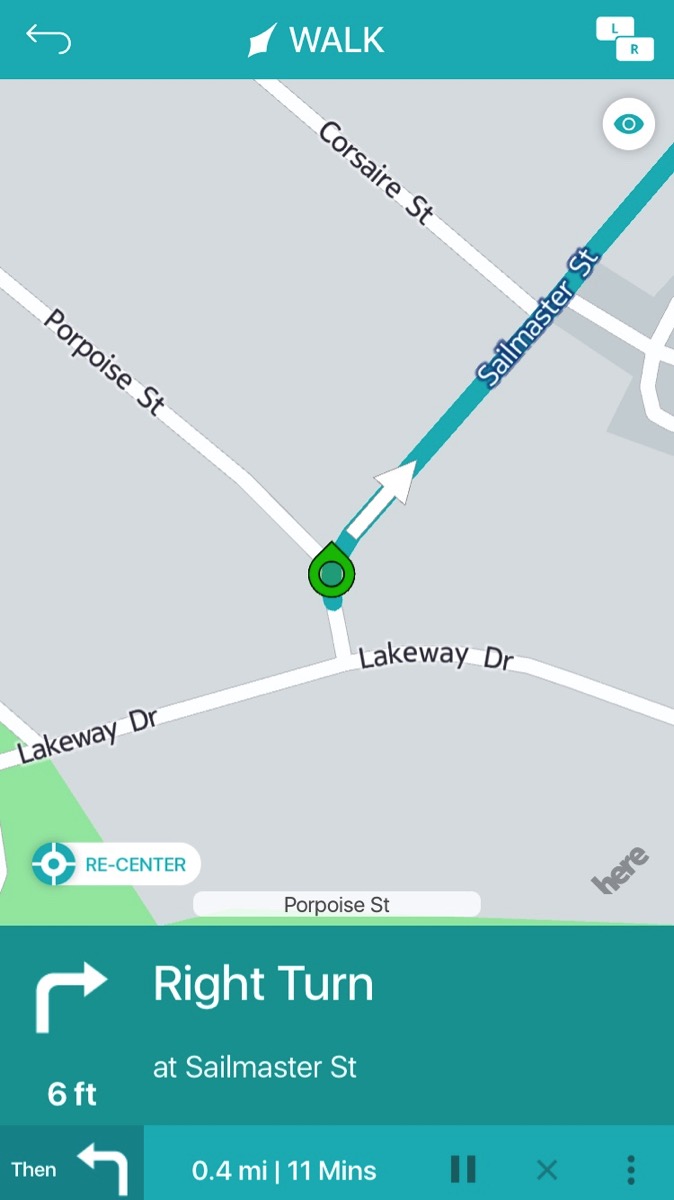
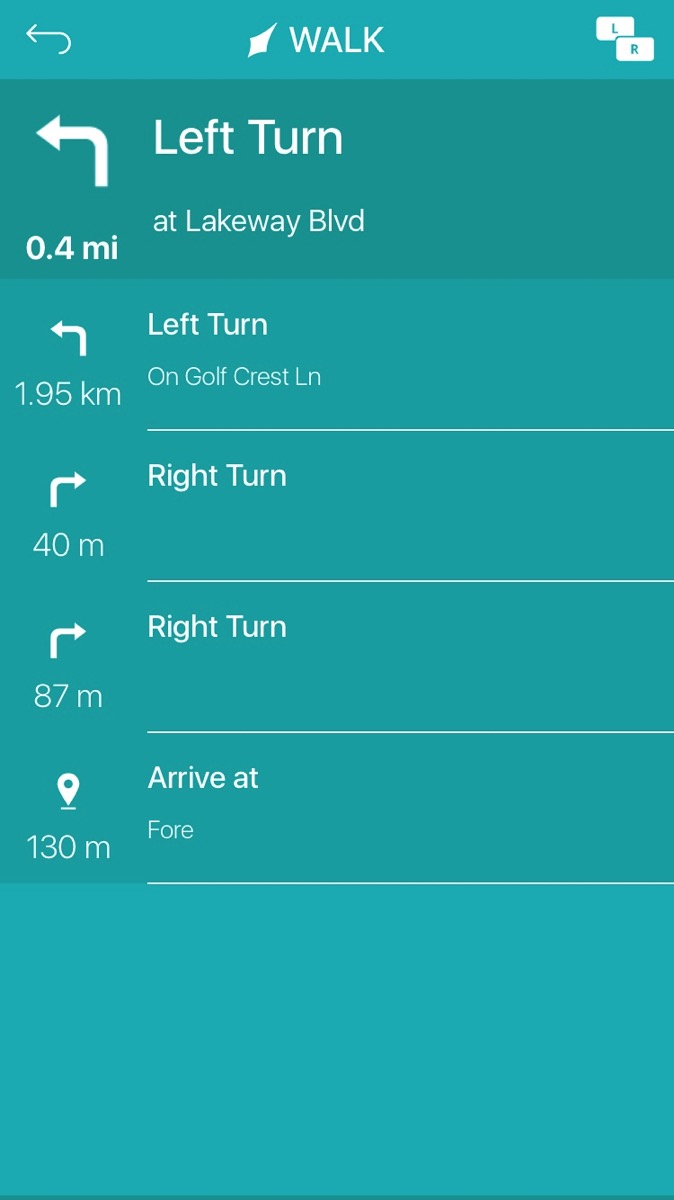
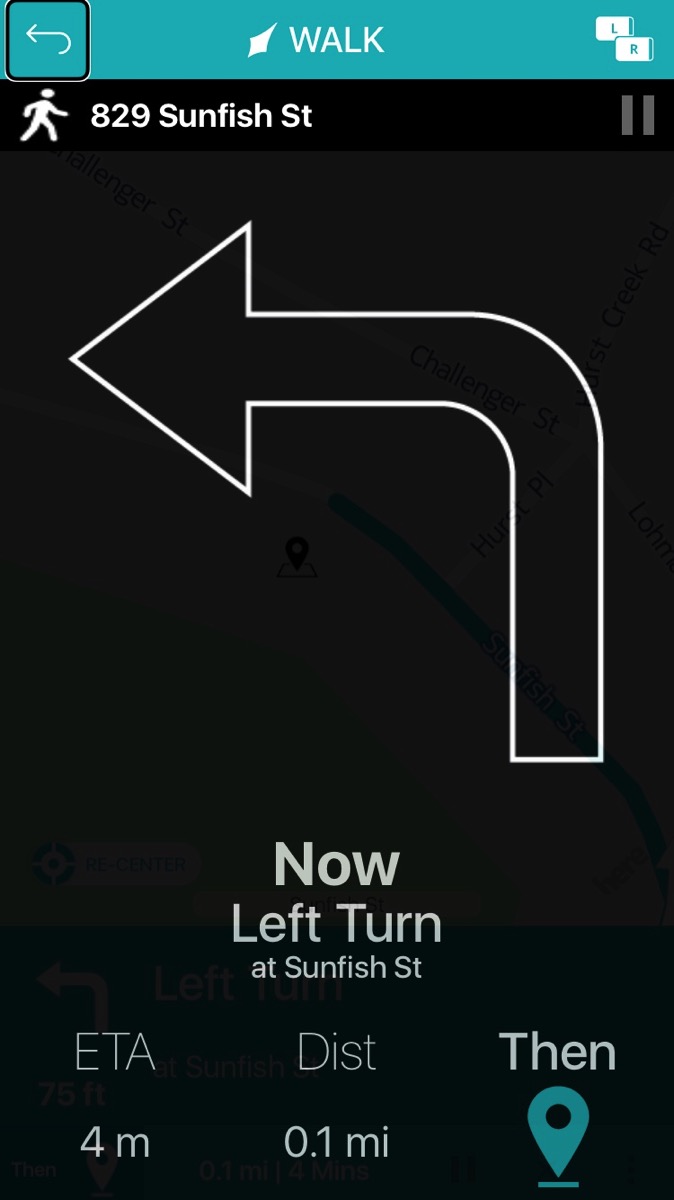
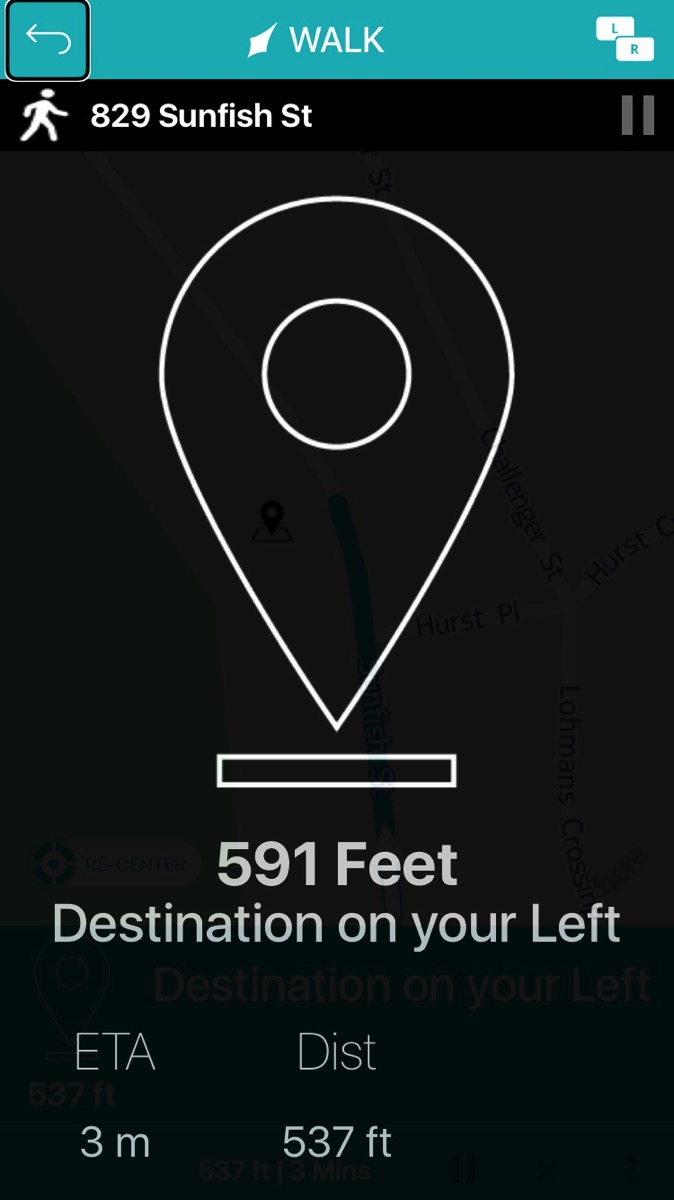
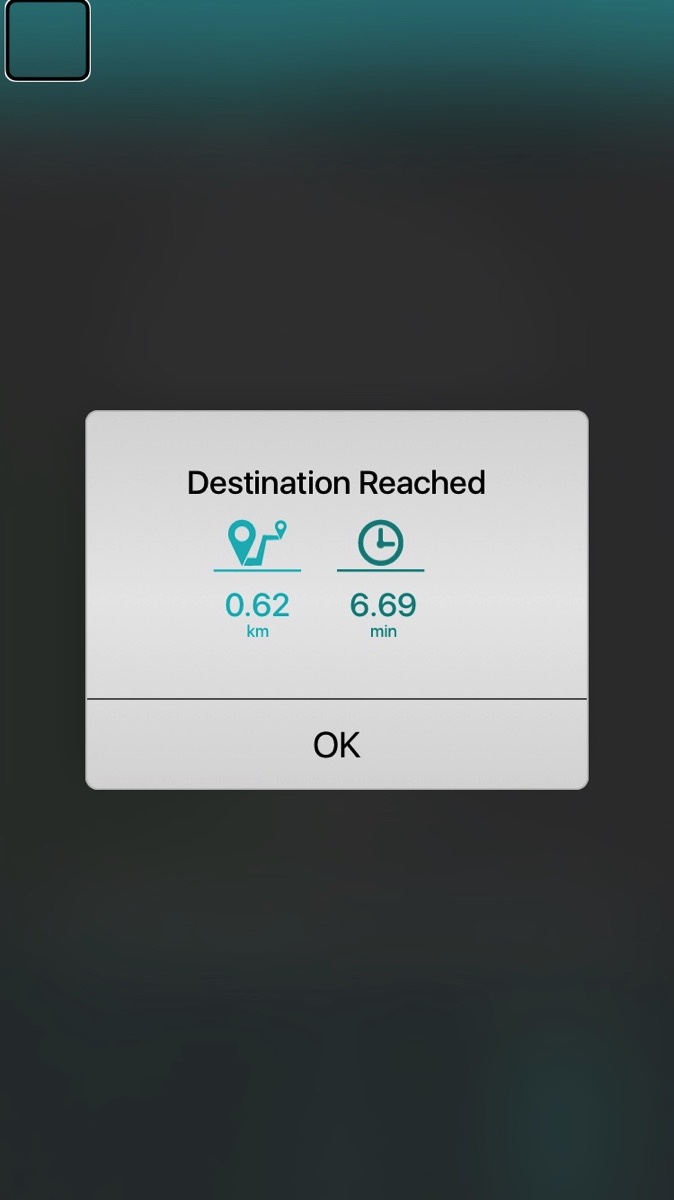
Once your entered destination is found, you will be presented with an overview route screen and options for pedestrian mode, vehicle mode, or bicycle mode. This is a similar presentation to many mapping apps, such as Google Maps or Apple Maps. Once you choose Navigate from the route information displayed, you will begin seeing, or hearing if using VoiceOver, your first instruction on the route. You can also choose to view the steps sequentially on a new screen. Several of the screen images for the route are shown here.

IMG 9402

Figure 13, Overview of route with options for travel mode and Navigate button


IMG 9404

Figure 14, Single instruction step page with instructions to turn right in specified distance and summary of next step in route


IMG 9399

Figure 15, Step by step instructions in sequential order


IMG 9405

Figure 16, Bold presentation of turn direction and distance to destination


IMG 9406

Figure 17, Bold presentation of destination with distance in feet remaining in route


IMG 9407

Figure 18, Destination reached screen with time and distance displayed.


Overall Impressions

I found the system to be very usable and very useful; I was also pleasantly surprised with the insoles, finding them to be quite comfortable. The app will still take some learning on my part but I believe it will become more intuitive with each of its update iterations. It is important to remember that this app was not necessarily designed exclusively for travelers who are blind or visually impaired, it will also be targeted toward those interested in fitness and general health activities, etc. That being said, there is already a plethora of reasons to encourage exploration with this product. Like any GPS device or app, it will not take you exactly to the precise spot you want to be at; general orientation and mobility skills still prevail. It will however help guide you without needing to have your phone your in hand or your ears occluded; and if there is a dual sensory loss, haptics is an emerging communication form for electronic devices that is easily accessible to those travelers who are deafblind. I would love to see the developers connect with the developers of BlindSquare to see what their combined ingenuity to produce!

Thanks for taking the time to review this post and I hope you have the opportunity to give Lechal a spin : )


Chris Tabb
chris@sensorytravel.com
http://sensorytravel.com
tabbc@tsbvi.edu
https://www.tsbvi.edu/tsbvi-blog/blogger/tabbc 


BlindSquare and GPS App Questions and Answers

January 20, 2016 • sensorytravel

BlindSquare and GPS App Questions and Answers

2016-01-20

Here is a series of questions from an Orientation and Mobility Specialist regarding BlindSquare. Hopefully these questions and answers will provide a bit of information you were curious about yourself…

1. “How do you pre-plan a route prior to going to the drop off? (I used simulate this location but I had trouble with it giving me the steps on how to locate the store from the bus drop-off).”

Okay, this first answer may be a bit long as it will likely cover things that will be coming up in other questions as well, so please bear with me. First thing to remember, and to relay to the student, is an understanding of what each app can and cannot do so that there is a reasonable expectation for the app and the activity. BlindSquare cannot give you turn by turn directions in and of itself; so planning a route from within BlindSquare is limited to things like putting in the address or searching for the location, reviewing the information page, “simulating the location”, and using “look around”. This is really an auditory version of dropping “the little guy” in the desktop version of Google Maps to a specific place and looking around to see what’s there; except, in BlindSquare you cannot move around, you can only point your phone in various directions to see what is nearby. There are other apps and programs that will let you do that, such as PC Maps that is available from American Printing House for the Blind (APH) or Sendero Group.

One of the ways to pre-plan the route is to find the place you want in either a search by category or just entering the name or address of the place you would like. Once the places information page is reached from the search, you can select “Plan A Route”. BlindSquare will give you options of third party apps that have been installed on the device that it can open in order to plan the route such as Apple Maps, Google Maps, Navigon, etc. For this instance we’ll say you select Apple Maps and that a pedestrian route will be used. Once BlindSquare opens Maps, the starting and ending points will already have been inserted into Maps for you by BlindSquare (you could also use a simulated location and create a route from your simluated location to the searched destination). From the initial screen of Maps, make sure you are on pedestrian mode (rather than vehicle or transit) and then choose start from the bottom of the screen. This will launch walking directions which you can then have an overview of. For voiceover use, choose the “list steps” button (looks like three horizontal lines at the bottom of the screen) rather than “Overview”, as overview is a visual map of the route. In list steps, you can read or flick through each step to here the route described. A similar process works in Google Maps to preview or pre-plan your route.

One of the nice features of BlindSquare is the ability to set directional style to whichever style the student prefers; Cardinal Directions, Clock-Face, Degrees, and Relative Directions are choices. So, as an example, you could simulate the location of a bus stop, intersection, or nearby landmark and then (while in Simulation mode choose “Look Around” or “Around Me” ) you could get information about the direction and distance to travel from the landmark to reach your destination. This would be especially helpful when crossing large open areas, such as parking lots, college campuses, etc. Again, remembering that BlindSquare by itself is not designed to give turn by turn navigation is very important.

2. “What is the best way to locate a specific bus stop on BlindSquare when planning a route? Can you use bus ID? I have found a handful that work this way.”

(This answer is specific to Austin, TX and Capital Metro; other areas use somewhat different ways of identifying bus stop locations. )
On the home page of the BlindSquare app, the very last category on the screen is Travel and Transport. Choosing this item will bring up a list of nearby bus stops and other transportation landmarks; if you are near a Greyhound station or train station, it will likely show that as well. You can choose from the list if you know your Bus Stop Identification Number or it may be shown by a name such as N. Lamar Transit Center. Scrolling down the page a bit further you will see a list of subcategories and one of the categories is Bus Stops. This option will give you a refined list that is more specific to what you are looking for. Thinking about where BlindSquare gets its data from, it is important to remember that the naming of these landmarks or Points of Interest (POI’s) comes from an outside source. Whatever that POI was named as by the original Foursquare user is what will be displayed. For the most part, the names are sufficient and consistent as users want the POI to be useable information; but, sometimes you get only partial or somewhat quirky naming. There are ways to request edits to the POI information but that requires a Foursquare account to be able to provide feedback to the keepers of the database.

Other ways to get bus stop location information include: searching for a bus stop identification number, using a third party app such as Capital Metro’s route planning app to find the stop identification number and then adding it as a “favorite” to BlindSquare so it will show up in the My Places screen and can be tracked, or navigated to as it is then a known location. One additional strategy is to be in simulation mode, as if you were at your destination or end of your bus route, and use the look around feature to hear what bus stops are nearby. They can then be added as favorites from within simulation mode so you will already have them on the device. The accuracy of the GPS signal will vary, but if all conditions are good, you could have accuracy within 16 feet to find the correct pole or bus shelter. This 16 foot bubble can really narrow down the hunting options when looking for a lone bus pole along a street.


3. “When I use track route Blind Square frequently let’s me know the distance from my location but it doesn’t tell you which ways to turn on the route. When I use plan route, I feel it doesn’t give you enough information during the route. Is it possible to use both at the same time?”

Very good question. Tracking BlindSquare is actually keeping track of your selected point(s) of interest. It will continue updating you on the distance and direction of your “tracked” POI. If the distance is getting smaller you are on the right track and if it is getting larger, you are getting farther from your target. It is like a hot and cold game. BlindSquare, and GPS in general, does not know that you cannot travel “as the crow flies”, is not aware of construction along the sidewalk, the building between you and the target, etc. You as the traveler must problem solve the walkable routes to reach the target; all BlindSquare in and of itself can tell you is how far and in what general direction to head toward. This style of navigation is the only option when you are off the street grid. If you are on a street grid than you can use “Plan a Route” to launch a third party app (e.g. Maps or Google Maps) to provide turn by turn directions.

It is possible to continue receiving the tracking information from BlindSquare the entire length of the route, so that you are receiving the turn by turn prompts from the map app as well as the tracking distance and direction from BlindSquare. In the Settings menu of BlindSquare there is an option for “Track destination automatically along entire route”. When this is selected, you will receiving ongoing updates about your tracked POI (i.e. your destination); when it is off, you will only get the tracking information when you are within 150 meters (about 500 feet) from your destination. An important element to keep in mind is how much information you and your student can process, and how much skill there is at selectively filtering information. You could easily have three or more voices speaking from the device simultaneously; BlindSquare has its own voice selection, as does VoiceOver, and the spoken prompts from the third party map app. It could sound like the cockpit of a WWII bomber with the pilot, copilot, and navigator all speaking simultaneously. One way to address this is to have some fun with the activity so the pressure and stress can be low, but also selecting unique voices. For instance, you might select a male voice for BlindSquare and a female voice for VoiceOver so that discerning who to focus attention on at any given moment can be a bit easier.

4. “What are the pros and cons of using Google maps vs. Apple maps with Blind Square? I feel like Google maps does a better job?”

Both are very useful, but like most things in life this is an area where people have unique preferences. To get an easy one out of the way, at the moment Google offers much greater levels of transit information as Apple Maps is only supporting a handful of cities. So, presently for most areas of the world, if you want transit you will be using Google Maps. For pedestrian routes, there are different ways that information can be viewed and previewed in both apps. There are different ways to request directions to be repeated and different distance thresholds the apps will deliver the next instruction at. Matching what works best for the student is ultimately what “does a better job”. Both apps are regularly updated so revisiting their pros and cons on a regular basis is a helpful strategy. Having a student practice with both to see how easily they can navigate is a good gauge of where to focus your efforts.

5. “When you save a bus ID, will other Blind Square users be able to access this information?”

When you save Points of Interest (POI’s), they go into the My Places screen but they do not propagate to other users unless you share them yourself. In order for “everyone” to have access to it, the POI would need to be created in Foursquare; additionally the developer of BlindSquare has set the app to only allow POI’s from Foursquare that have been “checked into” by at least five other people. He did this to reduce extraneous or fake POI’s from being reported. So, if you wanted to create a POI for a new bus stop, you could open a Foursquare account and create the POI. You would then need to coax four friends with Foursquare accounts to “check in” there as well. This happens rather quickly with places like Starbucks and even well frequented bus stops, but to make it happen quickly for other locations that are not frequented by the general public as often, the above steps would need to occur.

However, with the updates that have been added to BlindSquare, you can now go to any particular point of interest’s page on BlindSquare and there is a button to share your POI (visually this looks like a box with an arrow coming out of it, on the right side of the screen). So in this circumstance, you could create the bus stop POI, and or open its place page from My Places, and then by choosing the share icon you the options to E-mail, text, Air Drop, export to an application, send as a Tweet, or several other options for sharing the POI. You can in effect provide your whole caseload with an importable list of landmarks/POI’s that you would like them to have as a base set they can then add to.

6. “Is there a way to use Capital Metro app or Transit app with BlindSquare?”

At one time, the Transit app did work with BlindSquare but presently it is no longer one of the third party apps that BlindSquare can tie into. The developer can only use apps that allow access to their API or code so that the information can be interpreted correctly. All features can change in the blink of an eye in today’s world, but as of this writing, this list of third party navigation apps represents the only ones BlindSquare supports: TomTom, Sygic, GPS 2 Navigation, Waze, MotionX-GPS, MotionX-GPS Drive, MotionX-GPS HD, Google Maps, and Apple Maps.


2015.01.20

Chris Tabb

chris@sensorytravel.com

http://sensorytravel.com

tabbc@tsbvi.edu

https://www.tsbvi.edu/tsbvi-blog/blogger/tabbc


Technology in Orientation and Mobility

May 8, 2015 • sensorytravel

2015-05-08

Technology in Orientation and Mobility

A question came in about how technology is used during Orientation and Mobility lessons and I had so much fun typing the E-mail response I thought I would share it as a blog post.

There are so very many options today in terms of technology, but the basics of life shared in the terrific book Finding Wheels are still as relevant today as ever. The foundation of travel and getting where you want to go is enhanced by technologies but one still needs that special gray matter between the ears, a white cane or guide dog if non-visual or partial visual travel skills are needed, and a healthy serving of common sense. That being said, on with the toys : )

The Trekker Breeze is quite familiar to most folks as an accessible GPS solution that is on the verge of getting much, much better. HumanWare is about to release Trekker Breeze Plus. The Plus version will appear the same on the outside but the inside will have improved components that allow quicker and more stable connections to satellites, the ability to “lock in” Open Area mode, and I am sure a bevy of other enhancements. For those that have already purchased a Trekker Breeze, there is no need to take out a loan for the $800 to purchase a new device; there will be a $199 upgrade program. HumanWare will rebuild the originally purchased Trekker Breeze, giving it a new GPS module as well as a new battery if you send it in once the program gets up and running. Hopefully things will start happening toward the middle to end of May, 2015.

In terms of iOS and Android devices, there are a multitude of apps to choose from. A curated list of favorites with links and descriptions can be found at the blog post “Apps for Independence in the Community and Orientation and Mobility”

In terms of lessons with students (could also be used with Adults), here is another post with tech activities that can be done for each area of the Expanded Core Curriculum (ECC) during Orientation and Mobility lessons; “Mixing O&M, Technology, and the Expanded Core Curriculum”.

Oh, just one more note, this will all be updating soon as folks begin using the “taptic engine” in the Apple Watch as it will give tactile/haptic feedback to the wrist to alert the traveler when a turn is required along a route; there are different taps for right and left turns.

Geocaching and Letterboxing for Orientation and Mobility Lessons

May 7, 2015 • sensorytravel


Geocaching and Letterboxing for Orientation and Mobility Lessons

For those wanting to add some creative adventures to their Orientation and Mobility lessons, you can introduce the concept of Geocaching and Letterboxing.

Here are some suggestions for activities:

  • Have prepared locations for “letterboxing” with described directions, using cardinal directions from a known landmark and use the compass (braille, talking, or app from smart phone) as an orientation tool.

  • Have students enter the location of a cache with latitude and longitude coordinates into BlindSquare (iOS) or APH Nearby Explorer (Android) to get some prompting by tracking the coordinates as a landmark.

  • For a team activity, braille the clues and hints so that students can use their compensatory skills to read to the group.

  • To develop concepts for Orientation and Mobility, be sure to use words that emphasize the concept in the directions, such as parallel and perpendicular, traffic side of sidewalk, cardinal directions, with the landmark behind you, etc.

  • Consider making a sample activity plan to share with parents and families so they can participate with their child as well

The Geocaching app on the iPhone with VoiceOver affords a way to search for the presence of caches in your area, but as far as using it in an accessible way, it is a bit of a challenge. The app has a compass to direct the user but the compass position is not read by VoiceOver due to the app design. What you can get from the app is the latitude and longitude of the cache itself which can then be entered into another app that is more accessible. One such app that is specifically developed for users with visual impairment and blindness is BlindSquare (costs about $29.99). BlindSquare allows a user to enter their own places as landmarks and then edit the location with latitude and longitude coordinates. The technical part is that Geocaching displays coordinates in a hybrid form (e.g. 32˚ 49.818′ N and 116˚ 46.574′ W) while BlindSquare uses Decimal degrees (e.g. 32.8303˚ N and 116.7762˚ W); luckily there are free conversion apps you can get that will do the conversion for you. You can also use programs and apps like Google Maps to get the latitude and longitude of a location anywhere on the planet without having to have physically traveled there to set it as a landmark. This lets you have guidance to where you would like to travel. BlindSquare can provide directions with cardinal directions (N, S, E, W), relative directions (To Your Right, To Your Left, etc.), or clock face (toward One O’Clock, or Three O’Clock), and can have distances expressed as feet or meters. 

The app will get you close to the cache but locating the actual box will be more manual. One way to adapt this is to arrive early and to have a sound module with a motion sensor (such as the kind used in halloween decorations where the sound effect occurs as you walk by, [ http://www.electronics123.com/shop/product/300-second-usb-recording-module-with-motion-sensor-and-black-enclosure-5324?search=motion ]) placed at the cache or coordinate directions with tactile landmarks that will be clues to bring the students in closer. At some point you may be able use things like iBeacons and “Nearables” (just visit Estimote.com for fun dreaming about how you could use the technology). Another strategy is to use a wireless doorbell. The main unit can be placed at the cache site and the button for the doorbell can be used by the student looking for the cache, as they get within range the doorbell will respond to the button press and provide a sound clue of where to head to ([ http://www.amazon.com/Honeywell-RCWL300A1006-Premium-Portable-Wireless/dp/B001CMLAZ4/ref=sr\_1\_1?s=hi&ie=UTF8&qid=1431017857&sr=1-1&keywords=wireless+doorbell ]).

Letterboxing sites:

Geocaching sites:


Chris Tabb, 2015-05-07

chris@sensorytravel.com

Orientation and Mobility for Functional Programs

February 19, 2015 • sensorytravel


General Orientation and Mobility Recommendations for Functional Programs

(Note: This document was intended for all members of a student’s IEP Team. The pronouns are intentionally varied; “student” will be used at times and “child” will be used at others. Though it may appear that one section is intended for a parent and another for an education professional, all strategies can be implemented both in the home and the educational setting.)

Encourage Purposeful Movement:

Having times in the day that allow the student to practice moving independently will help them to develop skills that can be generalized to new areas and longer duration travel. Purposeful movement can be as simple as bringing a hand to a preferred toy that is next to or even on the body. When there are structures in place to support and encourage this movement at home and at school, the motivation to travel and begin moving with purpose will increase. Examples of establishing a supportive environment for purposeful movement include having a location for preferred toys that the student can access at any time and reliably find favored objects there. This strategy can be enhanced or extended by using tactile markers that show certain areas are “their” areas, such as marking a cubby and coat hook with a texture or small object that will help them to know where their own things are at school. The marker can also include a braille label so they begin develop the concept that braille is associated with names of things. Other places where it would be helpful to include “their” symbol or tactile marker are their chair, desk, door to their room at home, etc. With an expectation of predictability and control in the environment, the student is more likely to initiate travel on their own and also begin developing a sense of self-mastery and confidence for travel as they receive their own, earned reward when they reach their favored objects or destination of choice. This natural reinforcement perpetuates the motivation to move.

Another helpful strategy is to plan some “free exploration” time into the student’s day, just a brief period (e.g. 10 to 20 minutes) where they can practice navigating in the school and or home environment (even outdoors when the terrain and other conditions are safe for doing so). This gives an appropriate and educationally beneficial opportunity to satisfy and encourage curiosities they may have about their environments. If they become disoriented or find something unexpectedly, it becomes an excellent opportunity to develop problem solving skills. An example might be finding a hallway in the school that allows them to take a new route to class, or finding a library cart in the hallway and learning how to navigate around it safely. During this time, an adult is nearby to assist as necessary, but the student is deciding what to do and where to go, rather than the adult providing the agenda and directing their actions.

Developing Sensory Efficiency:

Encouraging the student to become aware of all of the sensory inputs they have the physical ability to attend to in the environment will help them begin nurturing the skills related to sensory efficiency. Remember to include tactile, auditory, kinesthetic, proprioceptive, olfactory, and if there is the ability to receive visual information, then vision as well.

One way to think of the difference between kinesthetic and proprioceptive is how you feel on a hill. When walking up or down a hill, you feel different muscles being used; and, if you are walking up the hill you certainly feel the additional strain and effort needed to ascend the hill. This muscle sensation is kinesthetic. This is a way to tell whether there is an elevation change on a path regardless of vision. Proprioceptive would be the sensation that you feel in your joints, such as in your ankle as you flex forward or backward to be upright while standing on a hill. The same sensation can be recognized while standing on a foam roll, or while leaning on the edge of a step or curb. These are not typically “taught” to children as most children have already recognized they are on a hill with their vision, it is considered incidental learning. When we take the time to deliberately draw attention to these other sensory inputs available to our children, we help them learn tools that they can use to access information about their environment at any time.

When teaching, we will often say “look at this” or “do you see how…”; these visual representations are often the way that adults learned and they convey the information they are teaching to students in the same manner. By thinking about the other senses available to our students we can help them to “visualize” their environments through these other, or additional sensory channels. It might be clapping hands in the gymnasium to hear the echo and then comparing the same clapping sound in the smaller and often more auditorily reflective bathroom; or, listening for the sound change while passing interconnecting hallways in a quiet main hallway. As adults likely learned about the world in a wholly different manner, it may take some additional thought and creativity to introduce sensory exercises, but the dividends returned in independence in the children is tremendous. Once they begin recognizing all the sources of information available to them and continue attending to the sensory information, their ability to visualize (visualized through a variety of sensory channels, such as sound waves that make a picture for sonar) their world continues to develop.

Here are some activity examples to practice:

  1. Localizing sounds, such as identifying the location of dropped object or pointing at a person who is walking and following the sound of their steps. 

  2. Aligning with sounds

  3. Walking toward, away from sounds

  4. Walking around sounds to circumnavigate something

  5. Identifying patterns in sounds

  6. Using echoes and reflected sound (passive and active echolocation)

  7. Distinguishing sources of sounds, such as car, lawnmower, airplane

  8. Estimating distance of sound

  9. Estimating direction of sound; is it coming toward or going away from

  10. Understanding when one’s own ability to use sound is impacted by changes within the environment, or within one’s self

  11. Finding other sensory means to verify or confirm what is being received or interpreted through the auditory channel

Tactile could be touching different textures or temperatures. It might be a lesson in feeling the sun on the skin for maintaining alignment along a route and determining direction of travel by knowing the location of the sun.

Olfactory sense can aid orientation and connection with the environment to provide clues for what might be happening in the environment, such as smelling the aroma of a bakery, or recognizing a strong smelling dumpster that you have to walk past everyday in the parking lot as you approach the school.

Advancing Concepts:

Rough and smooth, inside and outside, more and less, fast and slow, these are all concepts that can be developed across educational settings and in the home. It is best to present these in natural settings wherever possible such as finding the rough brick next to the smooth glass in the hallway while transitioning to an activity. The more concepts that are developed and used in varied places and settings, the greater the power and connection of the concepts. Those that are originally introduced at a desk activity might later be used when matching textures of clothing, discerning landmarks, etc. 

Often concepts that would be learned through exploration by children who are visual learners must be taught more deliberately to students who are blind and visually impaired as they may not otherwise recognize learning opportunities that are in the environment. This might include feeling the glass windows and discussing the qualities of glass; it holds temperature and is hot in the summer and cold in the winter, it is very often smooth and hard yet is makes a different sound than either wood, metal, or plastic. Each of these materials can be explored, and new concepts related to their qualities introduced, compared, and contrasted.

Consistency in Learning Environments:

Regular repetition and having all Team members working on the same concepts and skills, with the same language for these, will facilitate the acquisition of the concepts and skills. Keeping the number of new concepts and skills to a minimum level that is represented and reinforced in multiple areas across settings (i.e. in the classroom, with each related service, and at home) keeps the new information at the center of attention and learning and allows for a maximal number of occurrences to connect the concepts with different situations and environments. The more the concepts are experienced the quicker the acquisition, and the more they are encouraged the stronger their resiliency and meaning.

Routines in the student’s day provide natural repetition and opportunities to learn new concepts and practice others that have already been introduced. Ensuring that the child has the same routine presentation will help them achieve increasing levels of independence within the activities of the routine; photographs with descriptions of the steps for the routine and its set up can be laminated and placed near the routine area so that whomever is working with the student will set it up the same way. This allows the student to focus on learning the routine itself and any concepts that are being deliberately included rather than having their attention distracted by differences in setup or preferences of the adult they are working with. 

An example for the early stages of purposeful movement is an activity mat or rug, where toys are placed in consistent locations (e.g. the musical toy always goes in one corner, the vibrating toy diagonal to the first, a plush toy in the third, and a squeeze toy in the final corner). With the toys being placed in consistent locations, regardless of the adult the student is working with, they will be more inclined to explore, as they will be able to predict where their favorites will be, and then successfully achieve getting what they want independently. These skills can then be generalized to larger areas, such as travel within the classroom, the school building, and ultimately the school area, including the outdoor recess area.

Value Sharing:

Interactive games and value sharing time where the student is met at their own place and level of interest is the best place to begin developing rapport. This rapport development is a foundation for later expansion of skills when students are presented with possible fear at learning new skills (e.g. entering loud environments, crossing streets, etc.) and can rely on the trust they have developed with the adult they are working with.

As adults we often forget to be truly listening to the student, especially when the child is non-verbal. We need to remember to join them in their moment whenever possible rather than starting by trying to coax them into the moment we would like them to be having. We are much more apt to get their “buy in” to the activity we are proposing for them to do if we have first met them where they are and shared what they are involved in. In this way, we are already connected and communicating before offering what we would like them to consider doing. 

Motivators and Communication:

Keep track of what is motivating and aversive to your child. These items or sensory experiences can then be used as “carrots” or motivators for other activities if they are positive motivators for your child; or, if they are aversive stimuli they can be helpful for demonstrating choice and conceptual understanding with preferences. This can be during a choice sequence with a calendar system, etc. to verify that an item that is expected to be viewed as aversive by the child will not be chosen, and a preferred item will be selected. Once these items are consistently communicated using the actual object, they can then be transitioned to a symbol or piece of the item, such as the chain from the swing to represent the activity of swinging. Eventually the symbol will become even more abstract, such as one link of the chain or even a raised line drawing, just as print and braille words are an abstraction of the physical and concrete things they represent. 

Once the child is demonstrating the ability to use symbols they can be used to communicate planned activities, make choices, and express preferences. They can also be used to create functional routines and reasons for practicing routes, such as going from the classroom to the playground to reach the swing, or visiting the office to deliver a daily attendance record as part of a job routine. These activities can then be reviewed with the symbols to “talk” and communicate about the experiences of the activity; this further develops concepts, literacy, and a sense of understanding and control within the environment as well as the social benefit of sharing about an event.

Experience is the best teacher:

Let safe accidents happen. We learn from mistakes and if we prevent a child from having accidents occur, we are depriving them of the opportunity to learn from the mistake or accident. If a child is walking on the playground and tumbles on the ground due to a change in elevation, they learn what it is to fall, they learn how to get up, and with enough occurrences they learn to shift their balance and prevent themselves from falling. It has to be lived, to be learned. Certainly there are some accidents that are beyond the scope of safety, such as the fall from the top of the swing set or stepping into a street with moving vehicles. These are indeed areas the adult should intervene. But, if an accident will not result in bodily harm it can be an opportunity for learning to occur. Sometimes we pre-teach a skill to a child, such as a protective technique that includes bringing the hand up and in front of the head to prevent bumping into a table when bending down; generally the skill is only truly acquired when the child bumps the table with their head and is able to make the connection within themselves that bringing the hand up before bending down could prevent the bump in the future. If as adults we always provide the prompt or cue to implement the protective technique for them to avoid bumping their head, we are interfering with the natural learning process. There are certainly times we have to help the child to process the event and connect the technique with the desired outcome, but eventually they must learn to self-initiate the technique for it to be effective and having the “safe” accident happen is truly the best teacher.

Celebrate the Successes:

There are many “milestones” that are printed in books but it is important to keep track of personal “milestones”. The first time your child rolls over and is able to get to a toy, it is a milestone. Reaching an arm out to touch something that draws their attention is a milestone; it warrants celebration and a note in a family journal. These celebrations of successes in life are at least twofold. They help us track the succession of accomplishments that your child has and they help us to see how far they have come. Sometimes, in the day to day challenges we forget how far we have come, how many challenges we have in fact overcome. The awareness of growth helps us to have confidence that we will continue to move toward greater levels of independence and to remember “the best is yet to come!”

CHRIS TABB
STATEWIDE ORIENTATION AND MOBILITY CONSULTANT


Resources for Finding Orientation and Mobility Specialists Certified to work with School Age Students in Texas

October 14, 2014 • sensorytravel

Resources for Finding Orientation and Mobility Specialists Certified to work with School Age Students in Texas

Education Service Centers

The Education Service Center in your region has Education Specialists that focus on the area of Visual Impairment; they often know of many local resources and are in contact with specialists who provide related services on a contract basis. Use the following link to find your Region and its Web site, then search the Region’s Web site for Visual Impairment and Orientation and Mobility. [http://www.tea.state.tx.us/regional_services/esc/]

University Programs in Texas for Orientation and Mobility

Stephen F. Austin University: Tracy Hallak, hallaktracy@sfasu.edu 468-1173

Texas Tech University: Dr. Nora Giffin Shirley, n.griffin-shirley@ttu.edu 834-0225

On-Line Resources

Public Orientation and Mobility Listserve (great resource for reaching out to the community involved in Orientation and Mobility) [http://lists.trinimex.ca/mailman/listinfo/orientationandmobility]

AERBVI Orientation and Mobility Listserve (requires AER Membership) [http://lists.aerbvi.org/mailman/listinfo/oandm_lists.aerbvi.org]

Other National/International Sources

AER has an online page for advertising positions, AER Job Bank: [http://jobexchange.aerbvi.org]

Northeast Regional Center for Vision Education maintains their Employment Board: [http://www.nercve.org/professional-resources-search-jobs]

SpedEx is another online job posting site, Job Exchange: [http://www.spedex.com/job-exchange.html]


Other Orientation and Mobility Specialist Training Programs in the United States that Train Certified Orientation and Mobility Specialists (COMS)

California State University at Los Angeles

Dr. Diane Fazzi, dfazzi@calstatela.edu

Brenda Naimy, bnaimy@calstatela.edu

(323) 343-4411


Florida State University

Mickey Damelio, mdamelio@fsu.edu

(850) 583-1582


North Carolina Central University

Dr. Justin Kaiser, jkaiser@nccu.edu

(919) 530-5346


Northern Illinois University

Bill Penrod, wpenrod@niu.edu

(815) 753-8452


Salus University

Dr. Fabiana Perla, fperla@salus.edu

(215) 780-1367 


San Francisco State University

Dr. Sandra Rosen, srosen@sfsu.edu

(415) 338-1245 


University of Arkansas at Little Rock

Dr. William Jacobson, WHJacobson@UALR.edu 
(501) 569-8505 


University of Massachusetts Boston

Paula Kosior, paula.kosior@umb.edu 
(617) 287-7584 


University of Pittsburgh

Dr. George Zimmerman, gjz@pitt.edu

(412) 624-7247 


Western Michigan University

O&M for Children Contact 

(269) 387-5944


Mixing O&M, Technology, and the Expanded Core Curriculum

October 14, 2014 • sensorytravel

Mixing O&M, Technology, and the Expanded Core Curriculum

Here are some suggestions for using apps for each area of the Expanded Core Curriculum (ECC) as part of orientation and mobility lessons, and also a brief description of an option for a GPS app, BlindSquare. So, without further ado, here goes…  

Compensatory Skills:

Braille Touch is an app that allows six finger entry of text into the iPhone and can be used for route directions, grocery lists, phone numbers, etc. Compensatory Skills are clearly represented in this activity, and rather than the Orientation and Mobility Specialist “Teaching Braille”, they merely encouraging the generalization of the student’s already developed braille skills for use in the community, without having to bring a Perkins Brailler to the grocery store.  

Recreation and Leisure:

Geocaching is a fun activity that can be made accessible with GPS apps, such as BlindSquare. This is a great example of a mainstream activity that is developing orientation skills and concepts while also developing Recreation and Leisure skills, not to mention many core curriculum concepts.  

Adaptive Technology:

Just talking about mobile devices begins to address the area of Assistive/Adaptive Technology, but going beyond just talking and exposing a student to something like the compass app might be the connection the student needs to actually enjoy learning about cardinal directions; they can even pick their favorite digitized voice for the compass! Using apps that can read text have a multitude of uses. An app that has just recently been released that works very well is KNFB Reader. It photographs text and automatically begins reading it.  

Independent Living Skills:

Independent Living Skills includes things like going grocery shopping; the skills involved in grocery shopping are facilitated by scanning apps for bar codes and price checkers such as Red Laser or LookTel Recognizer. Another area of independent living is knowing the weather before heading out for the day to be able to dress appropriately, and students can address this with a weather app. Staying organized with a planning calendar and contact lists for calling transit companies and checking in at school, the ideas go on and on; this is a huge category.  

Self Determination:

Self Determination includes self knowledge and there are certainly ways to use the internet browser built into a mobile device to search about eye conditions; there are also simulator apps to demonstrate their eye conditions while they advocate for their needs. Students can set personal goals and track their progress using planning apps, notes, journals, and calendars.  

Social Interaction:

Telephone, texting, Facebook, Twitter, E-mail and many other resources built into phones and mobile devices are great teaching tools for Social Interaction, especially as student’s peers use these tools for social exchange, social planning, etc.  

Sensory Efficiency:

Sensory Efficiency can be addressed using a camera app or CCTV app for zooming in on directory signs or even produce prices in grocery stores, reading labels on packages, etc. And an example for non-visual skills, recording the traffic sounds at an intersection and then using it as an audio track for practicing the identification of lulls for timing crossings is one strategy. One of my favorite “homework” activities is to have a student listen to their favorite music, and while they are listening, ask them to practice listening and focusing on just one instrument so they can use the same skill while analyzing an intersection and listening for just one lane of traffic.  

Career Education:

How about looking up the address of prospective employer and then planning a trip to get a job application, or investigating the working conditions at a job site; sure is beginning to sound a lot like a Career Education activity. And, by taking the bus to get there, you are also practicing public transportation and taking on addressing more Orientation and Mobility. Wow two ECC’s in one activity : )  

Orientation and Mobility:

More specifically about Orientation and Mobility, planning bus routes with local transit apps, using GPS apps to virtually explore areas before exploring there in person, even asking Siri for their present location while traveling in residential areas or finding an address for a destination.   Have the student show you what they know and teach you how to do something using an adaptive gesture. What area(s) of the ECC would teaching someone else be?   Activities can easily be combined to address multiple areas in the same lesson.  

Lots of Apps for O&M:

Google Maps, Seeing Eye GPS, BlindSquare, and Nearby Explorer are just a few examples, but there are many more apps available for the various mobile device platforms, whether the device uses iOS, Android, or Windows Mobile. The Nearby Explorer app, which is only available on the Android platform presently, is available as a purchased app from the Google Play Store but can also be purchased directly through APH with Quota Funds. This is especially helpful if a student or client already has invested in an Android device, as the app alone is $99. Seeing Eye GPS is another full featured GPS app and is presently only available as an iOS app; it also carries a hefty price tag as far as apps go. It is free to download but requires a subscription. You can now purchase a monthly subscription for $9.99 to try it out rather than having to spend $70 for one year, or even $130 for a two year subscription.

The option I generally recommend people get started with if they have an iPhone or an iPad with a cellular plan is a $30 app called BlindSquare. It is not full featured for routing on its own, but it ties into other apps which are free, such as Transit and Google Maps to provide point to point directions. It also provides the user the ability to enter the latitude and longitude. The ability to edit and enter your own coordinates allows you to set a landmark for things like the front door to a building on a college campus one of your students will be attending, without ever having to have been there. The student can then learn how to do the same and have a full directory of landmarks before they even arrive at school!

The same strategy can be used for an early alert on bus travel about a stop location. It was previously possible to do this with a BrailleNote that had a GPS receiver and Sendero GPS software, but it is very nice that it can now be down with a reasonably priced app. Even for students who are very new to technology, all they have to do is open the app while they travel on a bus and it will begin reading the name of every street they bus crosses and all they have to do is listen. It allows them to have a bit more information about their location to know where they are along their route and to prepare for their departure from the bus.

Capturing the Moment!

October 13, 2014 • sensorytravel

How can a student who is blind or visually impaired have access to memories of events, just as a student who is visual looks at a photograph? Well instead of sending out and posting only photographs, how about including “audiographs” as well. Most folks today have the ability to use their mobile device to take pictures but they also have the ability to capture audio.

When doing activities with students where you would take a photograph to capture a memory, try adding in a sound capture with everyone in the group saying hello, where they are, what they are doing, and if they are having fun. A student who is blind or visually impaired will then have access to that same memory for years to come and can enjoy reflecting on it. In fact you may even find that students who are visual enjoy having an audiograph in their memory files to help relieve or share a moment they experienced. Just as a person who is visual can see the emotion in the facial expression, such as a smile for joy, the emotions of those in the audiograph will be conveyed in the voices of those in the audio scene being captured.

Photographs from a sporting event, campout, or summer program can are often added to a CD, sent to Dropbox for sharing as a download, or simply E-mailed; sound files can be saved and shared in the same way. So next time how about adding in a few MP3’s to make the memories accessible to everyone!

Making Play Areas Safe and Accessible

October 13, 2014 • sensorytravel

Playground Adaptations:

Playgrounds are wonderful places to learn about lots of things; body movement, cause and effect, balance, meeting other children, and just having fun.  When a child with a visual impairment goes to a playground, their experience may be vastly different than a child without a visual challenge.  There are a few easy ways to adapt a playground to make it more accessible for children with low vision as well as for those who are functionally or totally blind.

High Contrast Is The Way To Go

Most modern play structures have all sorts of colors and are full of contrast, but sometimes, the critical areas blend in with one another.  As an example, you could have blue swings, a yellow slide, and a green structure for the main frame.  All those colors help to identify the activity areas but by having the main frame all green, the steps blend in and the edges seem to disappear.  By highlighting certain elements, not the whole structure, the necessary information can stand out and not be obtrusive to the set as a whole.  A yellow or white edge on the lip of each step, a highlight dot where bolts connect rails or frame parts, even a stripe of paint or yellow electrical tape around a railing all make for easy visual cues of changes in elevation or caution areas.

Sometimes a play structure is made of wood and can easily blend in with the background setting if wood chips or much is used as a play surface.  Again, just putting bright dots (paint, tape, or stickers) where poles connect or are near head level, will get the visual information where it needs to go much easier then making it all yellow.

Auditory Clues Can Build Orientation

Having sound sources within a play area can help to add a new element of fun to the environment but can also add to a child’s ability to travel independently within the play area.  Having a set of wind chimes or bells, or even several sets with unique sounds, can help a child to reorient themselves auditorally if they become disoriented.  By listening to sound cues, they may be able to go from the slide to the steps with only the sound source as their guide for which direction to travel.  Many garden and landscaping stores sell poles with a shepard’s hook that can be inserted into the grass or wood chips and will hold a set of wind chimes.  Even if you have to bring it with you each time you go to the park, it will help your child be able to travel with greater independence and feel more comfortable and confident.  This allows them to know where they are whether they are touching a landmark or not.  The important thing to aim for is consistency, putting the sound source in the same location every time so they can reliably predict direction from it.  If there is not enough wind for the wind chime, a small, battery operated fan can be clipped to the pole and directed toward the chimes.